This tutorial explains how your AI chatbot workflow collects user information, passes it to a sub-workflow, and performs actions such as sending emails, logging data into Google Sheets, and notifying your Slack channel.
1. Overview of Your Workflows
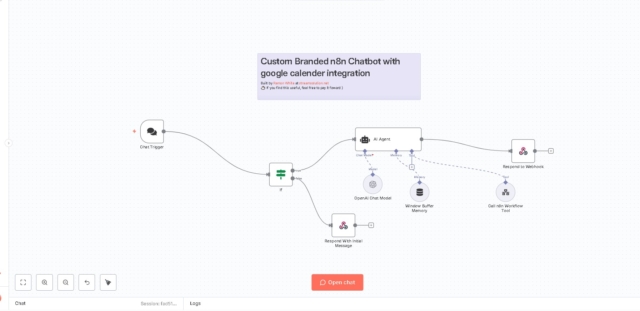
Main Workflow: Xtream-Solutions-AI-Powered Website Chatbot
- Trigger: The conversation starts via the
Chat Trigger. - AI Engine: Uses OpenAI (GPT-3.5-turbo) to interact with visitors.
- Memory: The
Window Buffer Memorynode stores conversation context (up to 20 messages). - AI Agent: The
AI Agentnode collects details such as:- Name, Email, Phone
- Business Name
- Project Requirements
- Appointment Time
- Workflow Tool: Once all required details are collected, the
Call n8n Workflow Toolnode is triggered.
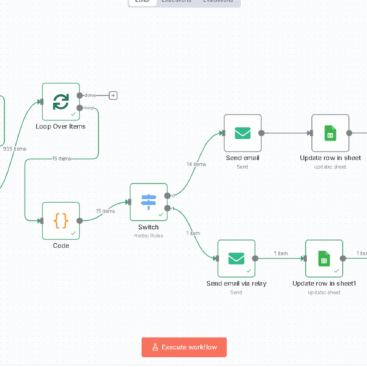
Sub-Workflow: send email, Google Sheets, Slack sub-workflow
- Inputs: Receives structured data (e.g.,
customer_name,customer_email) from the main chatbot. - Email: Sends a formatted HTML email to ramon@xtreamsolution.net and CCs the customer.
- Google Sheets: Appends the collected information to a lead tracking sheet.
- Slack: Posts a formatted notification to your designated Slack channel.
2. How the Main Chatbot Workflow Works
Key Nodes:
- Chat Trigger (Public Webhook)
Accepts messages from the website chat widget. - OpenAI Chat Model
Uses GPT-3.5-turbo with a temperature of0.4for professional yet dynamic responses. - AI Agent
- Uses the system message: “You are an intelligent personal assistant for Ramon… collect name, email, phone, business name, project details, appointment time… call
Call n8n Workflow Toolwhen all details are ready.” - Calls the sub-workflow with structured JSON data.
- Uses the system message: “You are an intelligent personal assistant for Ramon… collect name, email, phone, business name, project details, appointment time… call
- Call n8n Workflow Tool
Passes these inputs to the sub-workflow: jsonCopyEdit{ "customer_name": "...", "customer_email": "...", "customer_phone": "...", "business_name": "...", "project_details": "...", "appointment_time": "..." }
3. Sub-Workflow Actions
Nodes in send email, Google Sheets, Slack sub-workflow:
- Send Email Node
- Sends a HTML email using your SMTP account.
- Subject:
New Inquiry from {{ $json.customer_name }} - CCs:
{{ $json.customer_email }}
- Google Sheets Node
- Appends new rows with fields like:
- Name:
{{ $json.customer_name }} - Email:
{{ $json.customer_email }} - Phone:
{{ $json.customer_phone }} - Project Details:
{{ $json.project_details }}
- Name:
- Appends new rows with fields like:
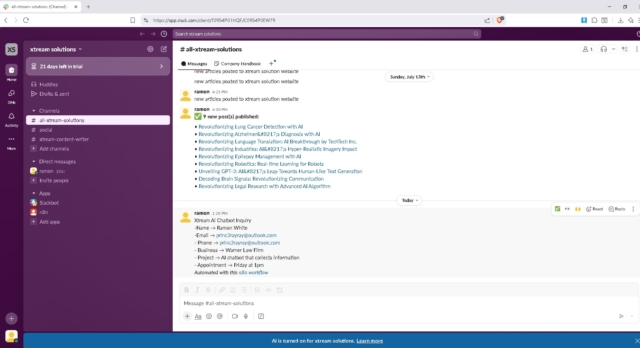
- Slack Node
- Posts a message: bashCopyEdit
Xtream Ai Chatbot Inquiry - Name → {{ $json.customer_name }} - Email → {{ $json.customer_email }} - Phone → {{ $json.customer_phone }} - Business → {{ $json.business_name }} - Project → {{ $json.project_details }} - Appointment → {{ $json.appointment_time }}
- Posts a message: bashCopyEdit
4. How to Embed the Chatbot on Your Website
You can add the chatbot using an iframe:
htmlCopyEdit<iframe
  src="https://n8n.yourdomainurl.net/webhook/f406671e-xxxx-4691-b39a-66c90aa2f103/chat"
  style="width: 100%; max-width: 400px; height: 600px; border: none; position: fixed; bottom: 20px; right: 20px; z-index: 9999; box-shadow: 0 0 10px rgba(0,0,0,0.3); border-radius: 10px;">
</iframe>
5. Preventing Spam or Abuse
a. Unique Email Check
- The Google Sheets node can be extended to perform a lookup before appending rows.
- Add an IF node after a lookup step:
- If email exists, skip sending the email and post a Slack alert.
b. Rate Limiting
- Use an IP check Code node at the start of the chatbot to block repeat submissions within a time window.
c. Bot Protection
- Optionally integrate Google reCAPTCHA on your web form (not mandatory for this chatbot since it’s conversational).
6. How to Add More Automation
- Follow-up Emails: Add a Wait node and another Send Email node to follow up after 24 hours.
- CRM Integration: Use the Google Sheets data as a base or directly connect to HubSpot or Airtable.
- Analytics: Track conversations by sending data to Google Analytics or a dashboard.